Why Tubeless Tires Fail to Seat or Seal
Tubeless setup has gotten complicated with all the conflicting advice flying around. And honestly, most of that advice skips the most important distinction entirely — seating failure and sealing failure are two completely different problems wearing the same disguise.
I’ve stood in a parking lot at 7am, floor pump maxed out, bouncing between tire and rim like some kind of deranged percussionist. That was 2019. Took me three hours to figure out I was solving the wrong problem.
So let’s actually separate these two things.
A seating failure means the bead won’t snap into the rim channel. Period. You pump. Nothing. You pump harder. The bead just sits there — loose, stubborn, completely indifferent to your efforts. More air doesn’t fix it because air isn’t the real issue.
A sealing failure is different. The tire seats fine. Looks perfect. You inflate it, walk away feeling smug, come back twenty minutes later and it’s hissing or pancake-flat by morning. The bead got home. Something else didn’t.
Three variables decide which problem you’re actually fighting: rim tape condition, bead channel design, and sealant volume or quality. Knowing which failure you’re dealing with saves hours. Probably saves your sanity too. So, without further ado, let’s dive in.
Check These Things Before Blasting Air Into It
Probably should have opened with this section, honestly. At least half my tubeless failures came from skipping straight to the pump because I was impatient and optimistic. Don’t make my mistake.
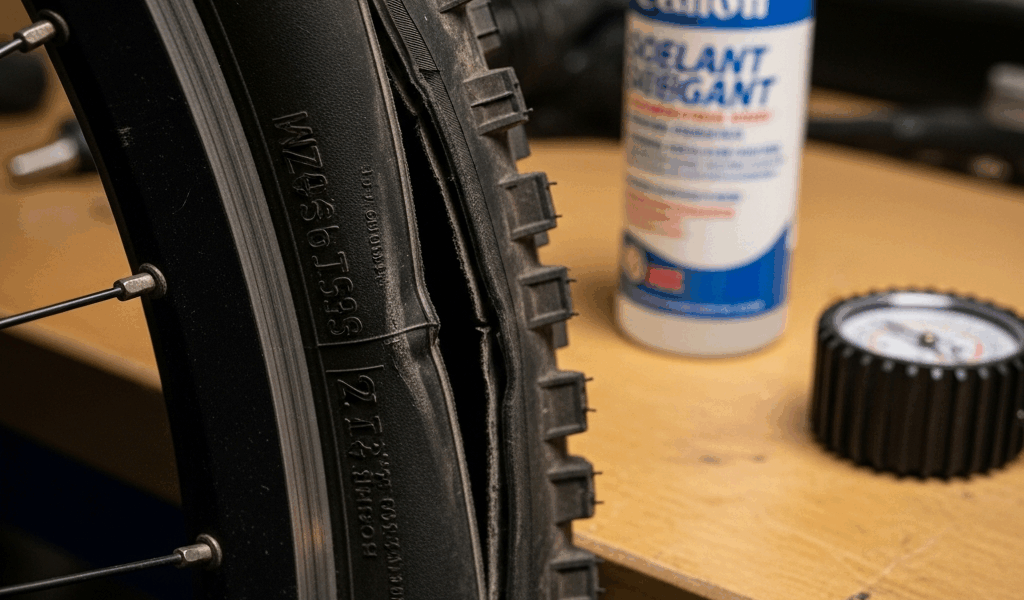
Start with the rim tape. Not a glance — actually look at it. Peel back the edges if you’re comfortable. Bubbles, gaps, wrinkles — any of those become a sealant escape route. Double-layer tape, which you’ll find on most quality rims like Bontrager’s Line or DT Swiss’s tubeless-ready hoops, should lie perfectly flat. Single-layer tape is thinner and peels more easily during the seating process. If yours is bubbled or torn, replace it. A $6 roll of Gorilla Tape or Stan’s yellow rim tape has saved more tubeless setups than any fancy tire lever ever will.
The valve hole alignment matters more than people think. A misaligned hole lets sealant pool around the stem instead of staying inside the tire where it belongs. Check from both sides. The hole should be clean, the tape flat around it, no excess material folded over the edge.
Your tire must be tubeless-ready — not just tubeless-compatible. Tubeless-ready tires, marked TR or UST on the sidewall, have reinforced beads and sidewalls designed for this. Tubeless-compatible tires work in a pinch but burp air more easily and fail more often under lower pressures. Check your specific model’s sidewall markings before doing anything else.
Wipe the rim channel clean. Old sealant, dried latex, trail grit — all of it creates a barrier between bead and rim. I use a dry rag first, then isopropyl alcohol on a stiff brush if there’s residue. Let it dry completely. A clean rim channel is the easiest free win in this entire process.
The tire bead itself should feel slightly tacky, not bone-dry and chalky. Storage tires sometimes develop a powdery feel after months on the shelf. A light dampening with plain water can help — not sealant yet, just water. You want grip, not slip.
Finally, remove the valve core before any seating attempts. A valve core tool costs about $4 on Amazon. The core restricts airflow dramatically — enough to prevent a stubborn bead from seating even with a strong pump. Set the core somewhere safe. Reinstall it only after the bead is fully locked in.
How to Seat a Stubborn Tubeless Bead Step by Step
- Remove the valve core with a valve core tool. Set it on your workbench, not the floor. This is non-negotiable — skip it and you’re wasting your time from the start.
- Pour sealant into the tire. For a 2.3-inch to 2.6-inch trail tire, 2 to 3 ounces is the baseline. Wider tires, or tires with lower sidewalls, start at 2 ounces and you can add more after the first spin. I’m apparently a Stan’s NoTubes loyalist and it works for me while Orange Seal’s thicker formula never quite seats as cleanly — though plenty of people swear by it. Thicker sealants seal better but make seating harder. Thinner ones flow faster into gaps. Worth knowing going in.
- Work the tire onto the rim entirely by hand. Get the full bead seated down in the channel, not resting up on the shelf. Your hands will hurt. The last section always takes more force than expected. Do it anyway — shortcuts here cause problems later.
- Inflate to around 40 psi with a floor pump. A lot of beads pop right here. Listen for the snap — both sides, ideally in sequence. If nothing happens, keep going.
- Push to 60 psi. This is where most stubborn beads finally commit. If yours still won’t seat at 60 psi with the valve core out, you probably need a compressor or a dedicated tubeless inflator like the Bontrager Flash Charger. A CO2 cartridge alone rarely generates enough sustained burst.
- Try soapy water if still stuck. Mix a few drops of dish soap — Dawn works, anything works — into a spray bottle of water. Spray along the bead where it meets the rim wall. The soap reduces friction between bead and rim edge. Inflate again immediately. This actually works, and it works surprisingly often.
- Spin the wheel once seated. Centrifugal force pushes sealant outward to coat the sidewalls and bead line. Thirty seconds minimum, both directions. This step is what actually creates the initial seal.
- If one bead seated but the other didn’t, deflate slightly, manually work the stuck bead back down into the channel with your thumbs, and inflate again. Don’t assume the whole tire is done just because one side snapped home.
- Reinstall the valve core once both beads are clearly holding position and not shifting under your fingers.
- Check pressure after 10 minutes. A 1 to 2 psi drop is normal as sealant settles. More than 5 psi suggests you’ve crossed from a seating problem into a sealing problem — which is the next section.
Tire Seats But Won’t Hold Air — What Is Actually Wrong
But what is a sealing failure, exactly? In essence, it’s air escaping from a tire that’s already seated correctly. But it’s much more than that — the causes are specific, and guessing wrong wastes another hour of your afternoon.
Run through these in order before pulling the tire off again.
Not enough sealant. A 2.3-inch tubeless-ready tire needs at least 2 ounces to seal effectively. Wider tires or tires running lower pressures often need 3 to 4 ounces. Thin sealant coverage simply leaves gaps. Pull the tire off, add 1 to 2 more ounces, reseat, try again. This fixes roughly 40 percent of sealing failures — at least in my experience across probably 30-plus wheel builds at this point.
Sealant has dried out. Sealant that’s been sitting in a tire for six months or more loses its active sealing properties. It goes tacky, clumpy, kind of like old rubber cement. If you haven’t refreshed your sealant since last season, drain what’s in there and refill with fresh product. Stan’s, Muc-Off, Silca — pick your brand, but make it fresh.
The valve core is loose or cracked. Unscrew it and inspect it — you won’t lose air just from doing this with the tire seated. A cracked core leaks slowly and consistently. Tighten hand-tight only. Gorilla-tight cracks it, and then you’re buying a new core for $3 and feeling embarrassed.
Rim tape failing under pressure. Rare, but real. Spray soapy water around the rim bed while the tire is inflated to riding pressure. Bubbles at the rim mean the tape is the culprit — shifted, lifted, or just not stuck well enough. You’ll need to deflate, remove the tire, re-tape, and start over. Frustrating. Worth doing right this time.
A bead crack or sidewall defect. Run soapy water around the full bead and sidewall while inflated. Bubbles will form right at the leak point — you won’t have to guess. A cracked bead means the tire is done. Return it or contact the manufacturer. No sealant in the world fixes a structural defect.
When to Give Up and Just Run a Tube
There is no shame in this. I spent an entire Saturday afternoon trying to seal a tire with a hairline bead crack I hadn’t spotted yet. Should have given up at hour one. Instead I gave up at hour four, slightly sunburned, significantly annoyed. That’s what makes tubeless endearing to us MTB riders — it humbles everyone eventually.
Pull the plug if:
- You’ve seated correctly, used fresh sealant, checked every surface with soapy water, and still can’t find or fix the leak point
- The bead is visibly cracked or the sidewall shows damage
- Your rim and tire combination is genuinely incompatible — uncommon, but older internal-width rims paired with modern wide-bead tires do occasionally just not work
- You’ve run through the full process twice and failed both times
Stuff a tube in there. A standard 29-inch or 27.5-inch tube depending on your wheel — a Vittoria latex or a standard butyl both work fine here — gets you moving in ten minutes. Ride your bike. Try a different tire-and-rim combination next time with better information. Tubeless is genuinely wonderful when it works. When it doesn’t, a tube is common sense, not defeat.


Stay in the loop
Get the latest trail rise updates delivered to your inbox.