How to Tell If Your Fork Is Actually the Problem
MTB suspension tuning has gotten complicated with all the conflicting advice flying around. As someone who spent three full seasons randomly cranking knobs on a RockShox Pike, I learned everything there is to know about diagnosing the wrong problem entirely. Today, I will share it all with you — including the embarrassing parts.
Before you touch a single adjustment, figure out what you’re actually feeling. Stiffness and softness aren’t the same complaint.
Harsh over small, rapid chatter — rocks and roots at moderate speed? That’s usually air pressure or compression damping. But if it feels bouncy and reactive, throwing you forward on climbs and snapping back after every hit? That’s rebound damping, or not enough sag. Big difference. Don’t make my mistake and treat those the same.
Now test the dive. Grab the brakes hard on a short descent. Does the fork eat up half its travel in one squeeze? Too soft — or rebound is too slow, meaning the fork isn’t recovering between compressions. Does it barely budge even under hard braking? Too stiff. Probably too much air pressure.
Do a bottom-out check too. Find something chunky and intentionally hit a big root or rock. A harsh spike at the very end of the stroke means you’re bottoming out. Fork never touches bottom but feels mushy mid-travel? Completely different fix. That’s what makes this diagnostic step so valuable to us trail riders — the symptoms look similar but the solutions go in opposite directions.
Write it down. Harsh small hits or harsh big hits? Wallowy and slow? Pogo-y and reactive? Bottoming out? The fix changes every time.
Setting Sag — The First Thing to Fix
Probably should have opened with this section, honestly. Sag fixes more fork complaints than any knob adjustment ever will.
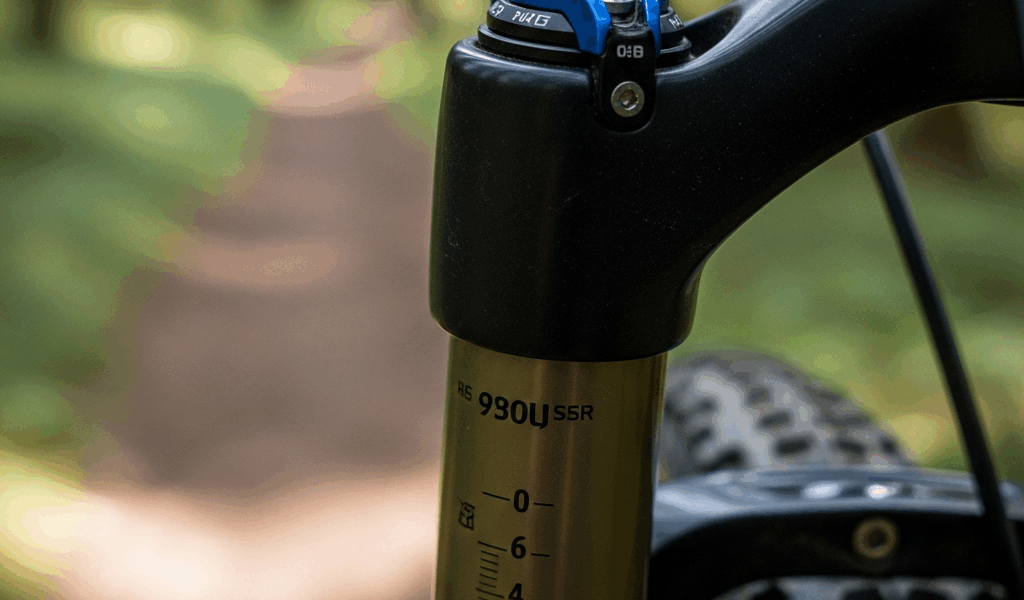
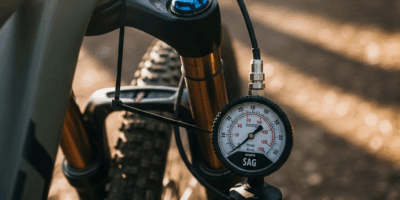
But what is sag? In essence, it’s how much your fork compresses under your body weight alone, standing still on the bike — measured as a percentage of total travel. But it’s much more than that. Get it wrong and every other adjustment you make is built on a broken foundation.
You need a zip tie or old rubber o-ring, your actual body weight, and about five minutes. Slide the zip tie down the stanchion until it rests against the dust seal. Sit on the bike in your normal riding position — not hanging off the saddle, not standing. Let it settle. Dismount carefully without bouncing. Measure the gap between the zip tie and the dust seal. Divide that by total fork travel, multiply by 100. That’s your sag percentage.
Target sag by riding style:
- XC (hardtail or short-travel fork): 15–20% sag
- Trail riding (120–150mm fork): 25–30% sag
- Enduro or park (150mm+): 30–35% sag
Sitting at 10% sag with a fork that feels too stiff? You need more air. Sitting at 40% with a fork that dives under braking? Less air. Start with these baseline PSI numbers measured in riding gear — not naked, as the manual awkwardly suggests:
- 130 lbs: 65 PSI (standard 130mm trail setup)
- 155 lbs: 78 PSI
- 180 lbs: 90 PSI
- 205+ lbs: 105 PSI
These assume a 130mm trail fork. A 150mm or 170mm fork typically runs 5–10 PSI lower for equivalent sag. Check your specific fork’s manual — RockShox, Fox, and Marzocchi models vary more than you’d expect.
Coil forks are a different situation. You’re mostly locked into whatever spring rate you bought. Still, sag matters for rebound tuning. Target roughly 30% sag in trail mode. Sagging more than that means the spring is too soft. Sitting at 20% means the spring is too stiff — accept less plushness or swap the spring outright.
Get sag right. Ride 15 minutes on familiar trail. If the fork still feels wrong after correct sag, then — and only then — look at damping.
Fixing a Fork That Feels Too Stiff
Start with air pressure. Drop 5 PSI, ride the same trail, assess. Do it again once or twice. Small increments matter — PSI changes feel more dramatic in a fork than most people expect.
I’m apparently impatient, and dropping 15 PSI at once worked terribly for me while careful 5 PSI steps never failed. On a 2023 Lyrik, I went 15 PSI too low in one shot and the fork felt like pudding. Climbed back to my starting point, worked down 5 PSI at a time, and found a sweet spot I never would have landed on otherwise. Don’t make my mistake.
Air pressure already low — under 60 PSI for your weight — and the fork still chatters over small hits? Check compression damping. Most modern air forks have a low-speed compression knob on the left leg. “Low-speed” is a misleading label — it actually controls how the fork reacts to medium-speed inputs like rocks and roots, not just slow movements. Turn it clockwise to soften. Start with one full rotation. Ride. Assess.
High-speed compression, if your fork has it, lives on a separate knob on the right leg. That one handles big impacts — leave it alone unless you’re bottoming out repeatedly. It won’t fix small-chatter harshness.
If pressure is already low, rebound is dialed, and the fork still beats you up, you likely have volume spacers in the air chamber. Spacers make the air spring progressively firmer throughout the stroke. Removing them isn’t a five-minute job — it takes a shock pump, a clean workspace, and real mechanical confidence. Most shops charge $40–$80 for the service. The manual lives on RockShox’s or Fox’s site if you want to DIY, but I’d skip it as a first attempt unless you’ve cracked open a fork before.
Fixing a Fork That Feels Too Soft or Dives Too Much
Increase air pressure in 5 PSI increments. Retest each time. Slow process. Works every time.
Air pressure at or above your target sag PSI and the fork still feels wallowy? Check rebound. Slow rebound is the sneaky culprit — the fork compresses fine but takes too long to extend, so it never fully recovers between hits. The next bump arrives while you’re still on a partially compressed fork. That’s what creates that mushy, sluggish feeling that’s easy to misread as a pressure problem.
Find the rebound clicker — almost always on the right leg, usually red. Counting from fully clockwise (maximum damping), turn it 1–2 clicks counterclockwise. Ride the same section. The fork should feel snappier, not harsher. Feels pogo-y and uncontrolled? You went too far. Turn it back one click clockwise. This adjustment dials in fast once you know what you’re feeling for. That’s what makes rebound tuning so satisfying to us tinkerers — the feedback is almost immediate.
One more scenario: fork bottoms out repeatedly even at high air pressure. Adding a volume spacer solves this better than cranking PSI higher. Higher pressure makes the fork ride higher in the travel — that feels harsh everywhere else on the trail. A spacer changes the spring curve specifically toward the end of the stroke. Shop job, same caveat as before.
When to Stop Adjusting and Get It Serviced
Some problems aren’t adjustment problems. So, without further ado, let’s dive into the ones no knob can fix.
Oil weeping from the seals? No adjustment helps. Fork won’t hold air overnight? A clicker won’t fix that. Noticeable stiction — resistance when you manually compress the fork by hand that doesn’t feel like damping — means the seals and oil need attention, not a different pressure setting.
Most air forks need lower leg service every 50–100 riding hours. That means fresh seals, oil refresh, and dust wiper replacement. Full internal service — damper cartridge rebuild — is typically annual. Past that window and you’re chasing adjustment problems that are actually maintenance problems.
A fork service runs $120–$250 depending on shop and fork model. Not cheap. But a freshly serviced fork running correct sag and dialed damping will outperform any amount of knob twisting on a neglected one. Learned that the hard way after half a season fighting a Pike that just needed a $140 service. That was embarrassing.


Stay in the loop
Get the latest trail rise updates delivered to your inbox.