MTB Rear Derailleur Not Shifting Into Lowest Gear — And How to Fix It Before Your Next Climb
Rear derailleur troubleshooting has gotten complicated with all the conflicting advice flying around. As someone who walked a Trek Marlin 7 for forty minutes up a technical ascent in Moab — because my granny gear vanished halfway through a 3,000-foot climb — I learned everything there is to know about diagnosing this specific problem. Today, I will share it all with you.
The lowest gear is your escape hatch on steep terrain. Lose it mid-ride and you’re either grinding something too hard or pushing the bike. Neither option is fun. Neither builds character.
Three things cause this. Cable tension too high. Low-limit screw cranked too tight. Or a bent derailleur hanger throwing the whole mechanism sideways. One of those three is almost certainly your problem right now.
Why Your Bike Won’t Drop Into the Granny Gear
But what is a rear derailleur low-gear failure, exactly? In essence, it’s a mechanical blockage stopping the cage from traveling far enough inboard to seat the chain on your largest cog. But it’s much more than that — because three completely different failures produce the same symptom, and the fix for each one is totally different.
Cable tension too high. The cable pulling your derailleur toward the largest cog is simply too tight. The shifter clicks, the derailleur starts moving, then stops one or two cogs short. The cage is fighting the cable. A quarter-turn at the barrel adjuster — counterclockwise — usually resolves this in under two minutes.
Low-gear limit screw too tight. Every rear derailleur has an “L” screw acting as a mechanical wall. Tighten it too far and you’ve literally stopped the derailleur before it reaches the lowest cog. This feels distinctly different from a cable issue. The derailleur just… stops mid-shift. Hard stop. Your shifter is fully clicked but nothing moves. Small incremental loosening fixes it.
Bent derailleur hanger. That aluminum tab bolting your derailleur to the frame? It bends. Crashes bend it. Bike bags bend it. Even leaning your bike against a wall wrong can bend it. Two or three millimeters of deflection is enough to prevent the chain from ever seating on the largest cog. The derailleur literally cannot reach, regardless of any adjustments you make.
Probably should have opened with this section, honestly. Most riders burn twenty minutes adjusting cable tension when a bent hanger is the actual culprit.
Step 1 — Check and Adjust Cable Tension First
Start here. It’s the fastest fix and needs zero tools beyond what’s rattling around in your saddlebag right now.
Find the barrel adjuster — that small cylindrical knob where the derailleur cable enters the derailleur body. Some bikes put it at the shifter instead. Check your manual if it’s not obvious. Spin it counterclockwise a quarter turn, then test the shift.
Drop into the lowest gear. Watch the chain. Does it fully seat on the largest cog, or does it hover one or two teeth outboard, chattering and skipping?
If it’s not seating, add another quarter turn counterclockwise. Gradual adjustments matter here — too much tension in the other direction and suddenly you can’t reach your highest gears. Small moves. Test after each one.
Chain fully seated and holding through several test shifts? You’re done. Cable tension was the whole problem.
Here’s what I see constantly, though: riders adjust the barrel, it holds for a week, then slips again. Frayed or sticky cables do that. If the adjustment won’t stick past a few days, replace the cable. Shimano cables run $8 to $15. The swap takes fifteen minutes. A frayed cable will never stay adjusted no matter how many times you touch that barrel adjuster — don’t make my mistake of ignoring it for two months.
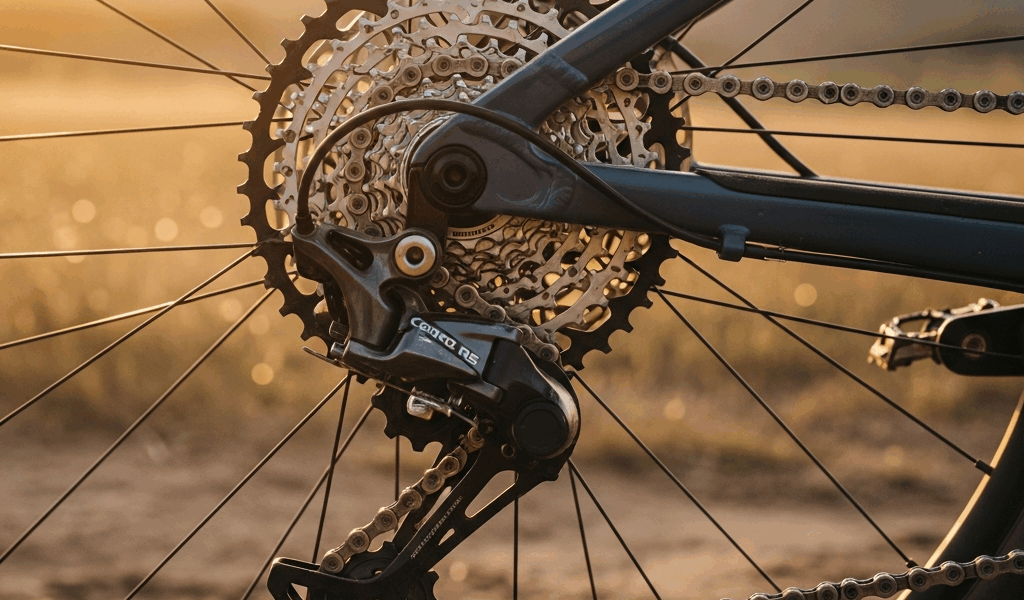
Step 2 — Inspect the Low-Limit Screw
The L-screw is a mechanical governor. Its entire job is stopping the derailleur from traveling too far inboard toward the spokes.
Flip your bike upside down or hang it in a repair stand — at least if you want to actually watch what the cage is doing in real time. You need to see the movement.
Find the L-screw on your derailleur body. Usually a small Phillips head labeled “L” on the barrel itself. Each brand positions it slightly differently, so pull up your derailleur’s manual if you’re hunting for it.
Loosen it half a turn. Shift to the lowest gear and watch the cage travel inboard. Does it reach the largest cog now? If yes, tighten the screw back incrementally until the chain seats cleanly on that cog, then back off a quarter turn — that’s your safety margin.
The safety margin is not optional. Loosen the L-screw too aggressively and the cage swings into the spokes. I’ve seen it happen on a group ride in Pisgah — snapped chain, bent cage, ride over. Start conservative. Half-turn increments. Watch the cage travel every single time.
Step 3 — Check for a Bent Derailleur Hanger
Cable tension adjusted. Limit screw checked. Still can’t reach that lowest gear. The hanger is bent — almost certainly.
Crouch directly behind the bike at wheel height. Sight down the derailleur cage against your cassette cogs. The cage should run parallel to the cogs — perfectly vertical, no tilt. Any visible angle, even subtle, means the hanger is bent.
The Park Tool DAG-2.2 hanger alignment tool runs around $60 and bolts to your axle to show the exact deviation. Most local bike shops have one and will let you borrow it, or just charge a nominal fee to check alignment while you wait.
Here’s the key thing about hangers: they’re sacrificial by design. They’re supposed to bend before the derailleur or the frame does. A replacement hanger costs $15 to $30 and swaps in five minutes. That’s intentional engineering, not a flaw.
Bending a hanger back straight works once. Maybe twice. The third bend will crack it — aluminum fatigues fast. Replace it rather than straighten it again. Search “[your frame brand] derailleur hanger” to find the exact part number for your model. Every frame uses a different hanger design, so specificity matters here.
When the Fix Doesn’t Stick — What to Do Next
Cable adjusted. Limit screw checked. Hanger looks straight. Still not shifting into the lowest gear.
Two remaining scenarios. First — your cassette’s largest cog is worn enough that the chain won’t pick up the teeth cleanly even when the derailleur fully reaches it. Worn cassette teeth slope backward and shed chain under load. A new cassette runs $40 to $80 depending on the spec, and the problem disappears immediately.
Second scenario — the derailleur cage itself is bent. A bent cage mispositions the chain regardless of any adjustment you make anywhere. That’s a new derailleur. Expect $80 to $200 depending on the model, whether you’re replacing a basic Shimano Altus or a higher-spec unit.
I’m apparently someone who has tried every parking-lot fix imaginable, and honest triage works for me while panic-adjusting everything at once never does. So: if you’re stuck before a ride and none of these fixes are working, shift to the second-lowest gear and ride easier on the climbs. You lose some mechanical advantage — not ideal, but you won’t be walking. Schedule a proper cable replacement or shop visit when you’re not staring down a trailhead start time.
Knowing the limits of trail-side fixes is its own kind of competence. That’s what makes systematic diagnosis endearing to us riders who’ve learned it the hard way.


Stay in the loop
Get the latest trail rise updates delivered to your inbox.