Why MTB Shifting Goes Sluggish
MTB shifting has gotten complicated with all the conflicting advice flying around. Blame the derailleur. Blame the cable. Blame the cassette. Everyone has a theory. But after enough trail time — and enough rides where I convinced myself the problem was something exotic before finding something embarrassingly simple — I’ve narrowed sluggish or delayed shifting down to four likely culprits: cable tension that’s drifted, housing that’s kinked or corroded from the inside, limit screws that are out of spec, or a drivetrain so caked in grime it’s essentially operating in slow motion.
Most of these fall somewhere between a trailside two-minute fix and a lunch-break garage job. That goes for 1x setups and 2x systems both. What matters isn’t just knowing the causes — it’s working through them in the right order so you’re not chasing a ghost that doesn’t exist.
So, without further ado, let’s dive in.
Start Here — Cable Tension Is Usually the Culprit
Probably should have opened with this section, honestly. I spent three full rides convinced I had a bent hanger before discovering my cable had simply relaxed over winter. Two minutes with the barrel adjuster and suddenly the derailleur was responding like it actually heard my inputs again.
Sluggish shifting almost always starts with cable tension. New cables stretch. Old cables creep loose through barrel adjuster vibration. Humidity makes housing swell slightly — just enough to eat up the tension you set last season. The difference between snappy shifts and that frustrating half-second delay? Usually a quarter-turn on the barrel adjuster. That’s it.
The barrel adjuster lives on the derailleur body on most Shimano setups. SRAM tends to hide it on the shifter pod itself — check both before assuming yours isn’t there. Spin it counterclockwise one full turn, then run through your gears. Sluggish upshifts toward the bigger cogs mean you need more tension. Sluggish downshifts toward the smaller cogs mean back it off slightly.
Work in quarter-turn increments. Shift through the full cassette after each tweak. You’re hunting for the point where the chain snaps to each cog without hunting or overshooting — when you hit it, you’ll know immediately. The whole system feels like it woke up.
If dialing tension solves it, ride on. Done. But if the chain still hesitates mid-shift even after nailing perfect tension, something else in the cable pathway is hiding the real problem.
Inspect the Cable Housing and Cable Condition
Bad housing kills shifting before anything else gets the chance. This is where neglected bikes almost always fail first.
Pull the housing from its frame stops and run your fingers along the entire length — slowly. Feel for kinks. Even small bends restrict cable movement enough to create that sluggish, dragging sensation. Look into the barrel opening where the cable exits the housing. You should see clean, shiny steel. White corrosion or dark pitting means that housing is generating friction every single shift. Frayed cable strands near the derailleur anchor point are another red flag. Moisture sneaks in, rust forms, and suddenly shifting feels like pushing through wet sand.
One compromised housing segment ruins the whole system. It doesn’t matter if 90 percent of your run looks pristine — that one kinked section from a crash or that corroded bit from a wet season will drag the whole setup down regardless of how perfectly you’ve dialed the barrel adjuster. Don’t make my mistake of adjusting tension six different ways when the real answer was a $30 housing replacement.
Surface corrosion without kinks? Try cleaning it aggressively with a dry brush first, then pop a few drops of light oil — not thick grease — into the housing opening and work it through. Sometimes that restores enough feel to hold you over. Kinks or deep corrosion? Replace the segment. A full cable and housing kit runs roughly $15–$40 depending on your groupset. Shimano OEM housing is about $18 for a full bike set. It’s not a permanent condition — it’s a lunch-break fix.
For the cable itself, check where it anchors to the derailleur. Frayed strands get pinched at the anchor bolt, which prevents clean movement. More than a few compromised strands and the cable gets replaced alongside the housing — always as a pair. New cable and housing takes maybe 20 minutes if you’ve done it before. Longer the first time, but not by much.
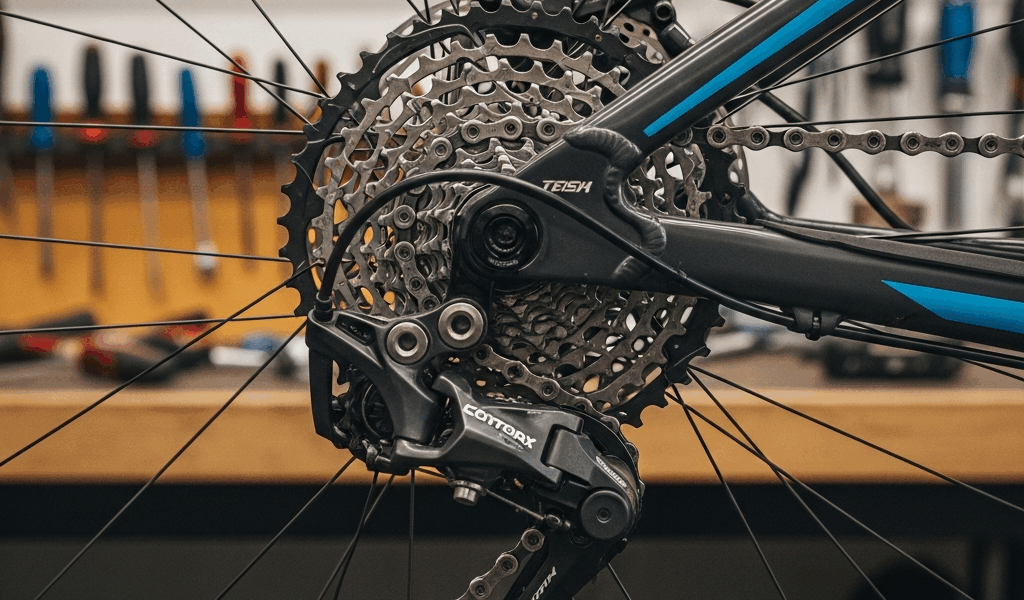
Check Derailleur Alignment and Limit Screws
Bent hangers and out-of-spec limit screws create different problems. But what is a sluggish shift caused by alignment? In essence, it’s the derailleur trying to reach a cog it’s physically prevented from reaching cleanly. But it’s much more than that — it mimics cable issues so closely that most riders never correctly identify it.
Start with the hanger. Most modern MTBs use a replaceable aluminum derailleur hanger bolted to the dropout — usually $20–$60 depending on your frame brand. Grab the derailleur body and try to move it laterally. No play is good. Any movement that feels like more than a millimeter means the hanger is bent. They sacrifice themselves in crashes to protect the frame and derailleur. Compare hanger prices before you start pricing derailleurs. It’s usually not the derailleur.
The limit screws — two small Phillips-head screws on the derailleur body, labeled L and H — stop the chain from overshooting either end of the cassette. They’re not supposed to directly cause sluggish shifting. But a limit screw set even slightly too tight can prevent the derailleur from reaching a cog cleanly. That hesitation reads exactly like a cable tension problem.
Here’s a quick check: shift to the largest cog and watch whether the chain settles cleanly or hunts around for a moment. Then shift to the smallest. If both land instantly, your limit screws are fine — move on. If one side hesitates, a quarter-turn counterclockwise on the corresponding L or H screw usually opens up enough clearance to clean it up.
The B-screw — the tension screw at the derailleur tail — matters more on 12-speed systems where cog spacing is tighter. Too much B-screw tension makes upshifts into the middle cogs feel sluggish and reluctant. Too little and you get chain rattle on the cassette. I’m apparently sensitive to B-screw tension and a quarter-turn adjustment works for me while ignoring it never does. If you’re running a newer Shimano Deore XT 12-speed or SRAM GX Eagle and upshifts feel slow specifically in the middle range, try opening the B-screw by a quarter-turn. Ride the full cassette after each adjustment.
Clean the Drivetrain If Nothing Else Worked
Dirty cassettes and chains cause sluggish shifting that mimics cable and housing failures almost perfectly. That’s what makes a filthy drivetrain so frustrating to diagnose — it looks like a mechanical problem right up until you clean it and everything snaps back to life.
Grab a degreaser. Finish Line Citrus Degreaser runs about $10 for a 17oz bottle. Park Tool ChainBrite works equally well. Remove the rear wheel, spray degreaser directly onto each cog, and scrub between them with a stiff brush. Old grease holds trail grit like a sponge — that sponge is what’s slowing down your chain movement and derailleur response. Rinse, dry thoroughly, move on.
The chain gets the same treatment. Run it through a chain cleaning tool — the Park Tool Cyclone is around $30 and worth owning if you ride anything with actual dirt on it — for 30 seconds with fresh degreaser. Dry it completely before relubricating. Use a thin chain lube. Shimano Dura-Ace lube or SRAM Speed Secrets both shift noticeably better than thick alternatives. Thick lube traps grit and creates the exact sluggish feel most riders are trying to prevent. That’s the irony — adding more lube makes it worse.
While the drivetrain is apart, check chain wear with a chain checker tool. They’re around $10 and take 30 seconds to use. A stretched chain shifts poorly regardless of everything else you’ve fixed. MTB chains typically need replacement somewhere between 1,000 and 1,500 miles depending on terrain and how often you clean them. A replacement chain runs $30–$60. That’s considerably cheaper than a new cassette, which a stretched chain will prematurely wear out if you keep running it. Don’t make that mistake twice — it’s an expensive lesson.
After cleaning, shifting should feel noticeably snappier. The derailleur moves the chain with less resistance. If you’re still getting delayed or sluggish shifts after all of this — fresh lube, clean cassette, dialed tension, inspected housing — the problem has moved beyond cables and grime. A bent derailleur cage or worn jockey wheels won’t respond to any of these fixes. That’s shop territory. The Park Tool website has a shop finder if you need one.
Run through the full cassette one more time under load before calling it done. Snappy through every gear? You’re finished. Still sluggish on one or two? Take it in — a bent cage is not a barrel adjuster problem anymore.


Stay in the loop
Get the latest trail rise updates delivered to your inbox.