How to Tell If Your Tire Pressure Is Wrong
MTB tire pressure has gotten complicated with all the conflicting advice flying around. As someone who’s been riding trails for a decade, I learned everything there is to know about what wrong pressure actually feels like. Today, I will share it all with you.
Within the first hundred meters of a descent, I can feel when something’s off. That’s not bragging — it’s just what ten years on the trail does to you.
Overinflated tires have a specific character. Not stiff. Harsh. Your hands go numb somewhere around the third root cluster. Small rocks send shocks straight up your arms instead of disappearing into the tire carcass. The bike starts skipping — actually bouncing over features that should roll clean. On loose dirt, edge grip evaporates. You lean into a corner and the tire skitters sideways like it’s on ice. There’s also a sound. A pinging, almost metallic bounce when you roll over rocks. You’ll recognize it immediately once you’ve heard it once.
Under-inflation announces itself differently:
- Squirmy, unpredictable cornering — the tire wallows side to side mid-turn like it’s made of jelly
- Rim strikes on rocks. That dull thunk of sidewall contacting something hard
- Sidewall roll when you bank hard. The bead shifts. The tire flexes more than it should
- Noticeable drag on hardpack — slower than you expect for the effort
- Pinch flats in tubed setups, or in tubeless, sealant that can’t seal fast enough on larger punctures
Both extremes feel vaguely “off” at first. Riders pump up, notice nothing dramatic, and assume they’re fine. Weeks pass. The mistakes compound quietly.
MTB Tire Pressure by Rider Weight and Tire Width
Probably should have opened with this section, honestly. Everything downstream depends on getting the baseline right first.
But what is the right baseline? In essence, it’s the intersection of your body weight and tire volume. But it’s much more than that — terrain, setup type, and even weather all nudge the numbers around.
Tire width gets underestimated constantly. A 2.3-inch tire running the same pressure as a 2.6-inch tire is going to ride like a brick. More volume means more air already doing the work — so the wider tire needs less pressure to hit the same support level.
Here are real-world ranges I’ve personally tested across multiple seasons:
| Rider Weight | 2.3″ Tire | 2.5″ Tire | 2.6″ Tire |
|---|---|---|---|
| Under 150 lb | 24–26 psi (F) / 22–24 psi (R) | 22–24 psi (F) / 20–22 psi (R) | 20–23 psi (F) / 18–21 psi (R) |
| 150–180 lb | 26–28 psi (F) / 24–26 psi (R) | 24–26 psi (F) / 22–24 psi (R) | 22–25 psi (F) / 20–23 psi (R) |
| 180 lb+ | 28–30 psi (F) / 26–28 psi (R) | 26–28 psi (F) / 24–26 psi (R) | 24–27 psi (F) / 22–25 psi (R) |
That front/rear split matters more than most guides admit. Run your front 2–3 psi higher than the rear — at least if you want steering that actually responds. The rear needs compliance. It’s absorbing the big hits, maintaining traction over chunky stuff. The front is steering. Different jobs, different pressures. Always.
Tubeless setups get their own rules. No inner tube means no pinch flat risk, so you can drop 3–5 psi below the table numbers above. That’s the whole point of going tubeless — that extra compliance changes how the bike feels on rough terrain. Running tubes? Add 2 psi across the board as pinch flat insurance.
Terrain Adjustments — Trail, Enduro, and XC
The baseline is just where you start. Terrain rewrites everything.
XC and hardpack riding wants higher pressure. Fast rolling, predictable grip on firm dirt — stay at the top of your weight bracket. No pressure drop needed here.
Trail and all-mountain is where most of us actually spend our time. That’s what makes mixed-terrain riding endearing to us trail riders — it keeps you honest. Roots, rocks, loose corners, the occasional drop. Use the middle of your range. For a 150–180 lb rider on 2.5-inch tires, that’s 26–28 psi front, 24–26 psi rear.
Enduro and downhill on technical, chunky terrain? Drop exactly 2 psi from your baseline. Not 5. Not 3. Two. The sidewall flex helps absorb hits and lets the tire conform around rocks instead of deflecting off them. Go too low and you’re chasing rim strikes and sidewall roll all day.
Wet, loose conditions warrant a 1–2 psi drop from your standard numbers. Dry and dusty — maybe creep up 1 psi for a faster roll. Small adjustments. They add up.
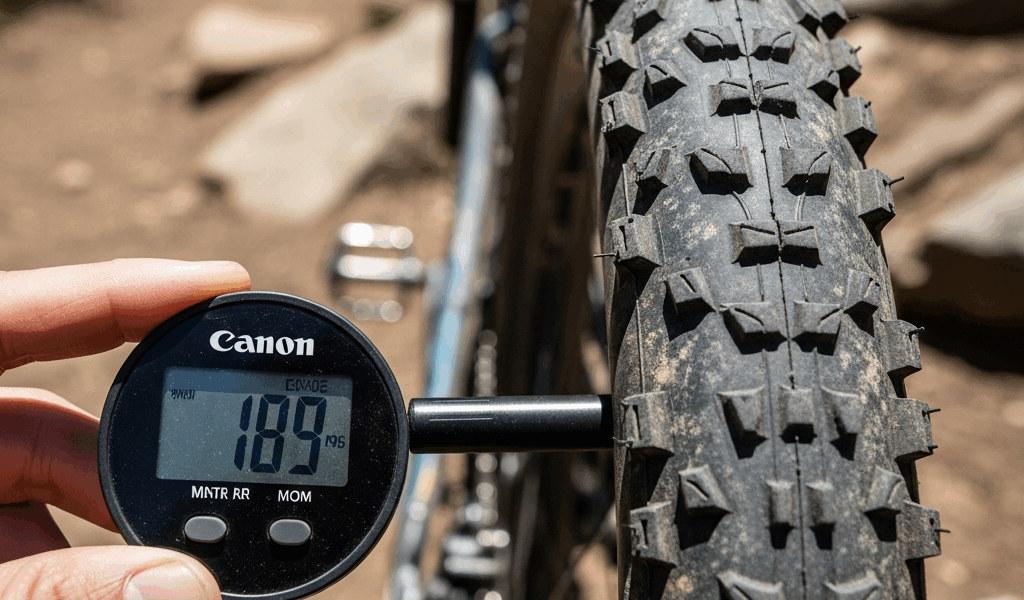
How to Set and Check Pressure the Right Way
Frustrated by wildly inaccurate readings from a $15 floor pump, I picked up a Lezyne Shock Drive — around $50 at most shops — and that fixed basically everything. Cheap pumps are genuinely unreliable below 30 psi. I’m apparently sensitive to a 2 psi difference and the Lezyne works for me while a basic pump never gave me consistent readings twice in a row. Don’t make my mistake and spend six months wondering why your setup feels wrong.
Here’s the process, start to finish:
- Check pressure cold — before the ride, ideally first thing in the morning before the tires have absorbed any ambient heat
- Use a quality shock pump or a hand pump with a verified gauge. Attach firmly to the valve stem
- Set the front first. More pressure. Add air slowly and check twice
- Move to the rear. Set it 2–3 psi lower than the front
- Re-check both tires. Detach and re-attach the pump head to confirm the gauge isn’t holding a stuck reading
- After your first descent, stop. Check again. Tire temperature rises with use, so pressure rises. A 2–3 psi bump is normal. Seeing 5+ psi means you started too high
When venting air, go slow. Hold the valve for a second, release, check the gauge. Overshooting is embarrassingly easy — you’ll go from 26 psi to 21 psi before you realize it.
Common Pressure Mistakes and How to Avoid Them
First mistake: chasing the sidewall maximum. That number is a liability figure, not a setup recommendation. A 2.5-inch tire stamped “max 40 psi” will feel genuinely brutal at 40 psi. Ignore it completely.
Second mistake: matching front and rear pressure. Identical front and rear pressures kill the ride quality — the front steers, the rear absorbs, and they need different numbers to do those jobs well.
Third mistake: setting it once and walking away. Temperature swings, sealant weight shifts, terrain variety — pressures drift. Re-check every two weeks, minimum.
Tubeless riders miss this one constantly: sealant adds weight and changes tire behavior. A Maxxis Shorty loaded with 3 ounces of Orange Seal rides differently than the same tire run dry. Refresh your sealant and you might want to pull 1 psi out.
Here’s the rule worth keeping: start at the middle of your weight bracket, ride it, then adjust by 1 psi at a time. A 2 psi difference is not subtle — you’ll feel it within fifty meters. Most of us overthink this. The tire tells you what it needs. You just have to pay attention.


Stay in the loop
Get the latest trail rise updates delivered to your inbox.