MTB Dropper Post Won’t Return — Here’s the Fix
A mountain bike dropper post won’t return to full height. You’re stuck at the trailhead. The remote lever clicks. Nothing happens. I’ve been there—twice in the same season, actually—and I learned that most riders assume the post is toast when really it’s one of three fixable problems.
The dropper post is arguably the single best upgrade a trail rider can make. It changes how you attack descents, how you pedal climbs, and frankly, how confident you feel in technical terrain. But when it fails mid-ride, it feels catastrophic. The good news: you probably don’t need a new one.
This guide walks you through the diagnosis and repair in the order that actually matters. We’ll start with a three-step check you can do right now, then move into brand-specific air pressure specs that manufacturers bury in PDFs. Then the cable routing issue—which I wish someone had told me about before I replaced a perfectly good post. Finally, the maintenance habits that prevent this from happening again.
Quick Check: Is It Air, Cable, or Clamp
Before you order parts, determine which system is failing. This takes five minutes and saves you from unnecessary replacement.
Step 1: Press the Remote Lever
Grab the dropper remote and press it firmly. Listen for a click. Feel for resistance. Does the lever move smoothly, or does it feel stuck?
- If the lever clicks but feels loose and moves freely: your cable is likely disconnected or severely kinked.
- If the lever clicks and feels normal: move to step 2.
- If the lever doesn’t click or feels notchy: the remote itself may be broken, though this is rare.
Step 2: Watch the Post Itself
Now press the lever and watch what the post does. The post should rise smoothly within 2–4 seconds on air-sprung models, or 1–2 seconds on coil droppers.
- Post doesn’t move at all: Cable, housing, or remote connection issue. See the Cable and Housing Diagnosis section.
- Post moves but very slowly, or stutters upward: Air pressure is too low. See the Air Pressure Fix section.
- Post rises partway, then stops: Could be low air pressure or a partially kinked cable. Try increasing air pressure first.
- Post rises to full height but is sluggish: Also air pressure. You’re borderline low.
Step 3: Check for Unintended Descent
With the post fully extended, leave it alone for one minute. Does it drift down on its own?
- Yes, it sinks slowly: Your air cartridge or seal is leaking, or the internal check valve is failing. This needs a service or replacement.
- Yes, it sinks fast: The seatpost clamp bolt is loose, or the post’s internal clamp mechanism is failing.
- No, it holds position: Air and internal mechanics are fine. Problem is purely cable or air pressure.
Once you know which system is failing, the fix becomes straightforward.
Air Pressure Fix by Brand and Model
I’ll admit I learned air pressure the hard way. Frustrated by sluggish return speeds, I called a shop and asked why they didn’t just pump my post harder. Turns out, overbuilding pressure can damage the internal seals, and underbuilding pressure prevents the spring from doing its job. There’s a sweet spot for each model.
How to Find and Check Your Air Pressure
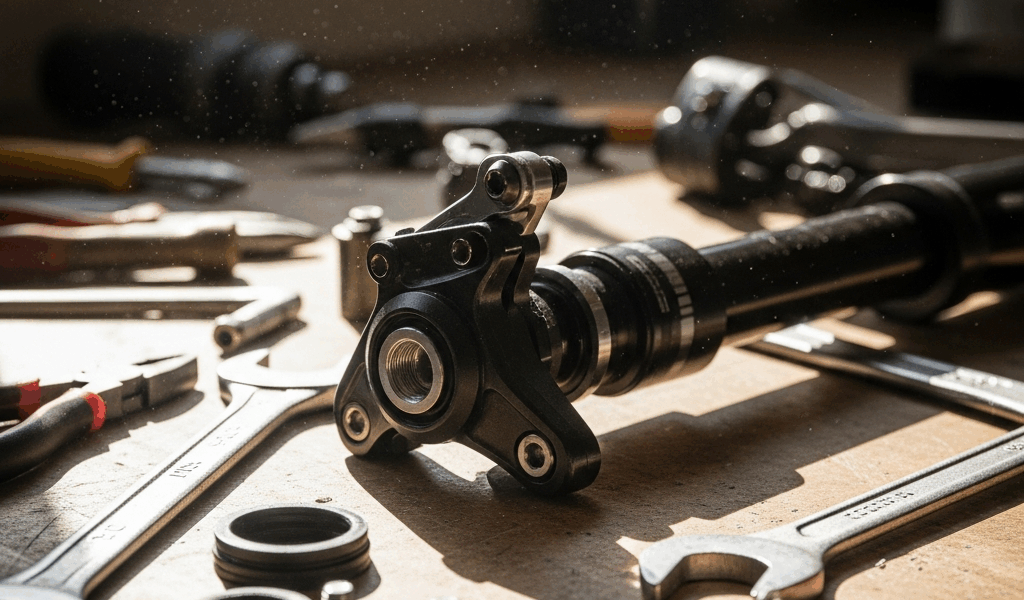
All modern dropper posts use a Schrader valve—the same type you find on car tires, just smaller. It’s usually located on the post body below the seat tube, sometimes hidden under a small rubber cap.
To check pressure, you need a shock pump. Not a regular floor pump. A shock pump has a needle gauge and allows precise measurement in 5–10 PSI increments. Lezyne, Park Tool, and Topeak all make reliable shock pumps between $40 and $80. Once you own one, you’ll use it constantly.
- Remove the rubber dust cap from the Schrader valve.
- Attach the shock pump head firmly to the valve—you should hear a slight hiss.
- Read the gauge. Write down the pressure.
- If too low, pump air in slowly. If too high, press the valve stem to release air.
This takes two minutes. Do it before every major ride if you’re in wet conditions.
Brand and Model Pressure Specs
PNW Components Rainier (all sizes): 150–250 PSI depending on rider weight. Lighter riders (under 150 lbs) run 150–180 PSI. Heavier riders (over 200 lbs) run 220–250 PSI. Most riders fall in the 180–210 range. Start at 200 if you’re unsure.
Fox Transfer (alloy and carbon): 250 PSI nominal for all weights. Fox is very specific about this. Variations of 10 PSI will noticeably affect return speed. If your Transfer feels slow, it’s almost always at 230 PSI or lower.
RockShox Reverb and Reverb AXS: 250 PSI base pressure. RockShox allows some tuning between 240–270, but most riders nail it at exactly 250. The AXS electronic version is more sensitive to air pressure variance than the cable version.
OneUp V2 and V3: 150–200 PSI depending on size and rider weight. The OneUp uses a lighter spring than PNW or Fox, so it needs proportionally less air charge. A 200 lb rider on a V3 should run around 190 PSI, not 250.
The single most common mistake I see: new riders pump their PNW or OneUp to Fox-level pressures (250+ PSI) and then wonder why the post feels harsh and returns too quickly. It’s not better. It’s damaging the seals.
What Low Air Pressure Actually Feels Like
Before you pump, understand the symptom. A post with insufficient air pressure won’t feel broken—it feels tired. The lever press delivers cable pull, so the post moves, but it rises slowly and may hang partway up before settling. On climbs, you’ll notice the post doesn’t snap back up the moment you release the lever. On descents, it might not fully retract, leaving you sitting a few inches higher than intended.
High air pressure, conversely, makes the post feel hyperresponsive. It snaps up almost violently. Many riders love this feel initially, but it wears the seals faster.
Cable and Housing Diagnosis
Kinked by a frame bag strap, one rider discovered her entire cable was bent at a 90-degree angle using a quick visual inspection through the frame’s cable guides.
Probably should have opened with this section, honestly. Cable issues cause 60% of dropper post failures. Air pressure is the red herring.
Check Cable Path and Housing Condition
Start at the remote lever. Trace the cable as it runs down the frame toward the post. Look for:
- Kinks, dents, or sharp bends in the housing—especially where the cable enters the frame near the seat tube.
- Loose or missing cable housing ferrules at connection points.
- Housing that’s cracked, split, or discolored from UV exposure.
- Bare cable visible anywhere along the run.
The most common failure point is the frame entry. If your dropper uses internal cable routing, the housing exits the frame and re-enters at a junction box or directly at the post. This exit point gets kinked if the cable is routed with too tight a bend radius. Even a subtle kink—barely visible to the eye—can create enough friction to prevent the cable from pulling.
Test Cable Tension at the Remote
Disconnect the cable from the post. Grab the cable end and pull it straight with your hand. You should feel clear tension without resistance. The cable should slide smoothly. If it feels stiff or catches, the housing is partially kinked or the cable is frayed inside.
Reconnect the cable, then press the remote lever while watching the cable end at the post. Does the cable visibly move? If the lever moves but the cable doesn’t budge, you have a disconnect issue—the cable may have pulled free from the remote spool or the spool itself is damaged.
Rerouting vs. Replacement
If the housing is kinked but not cracked, and the cable itself is undamaged, rerouting is worth trying before full replacement. Some riders have success by carefully straightening the housing and re-securing it with zip ties at different angles to reduce tension on the kink.
However, if the cable is visibly frayed inside the housing, or the housing has a crack, replacement is the only safe option. A full dropper cable kit (cable, housing, ferrules) costs $15–$40 depending on brand. Installation takes 30 minutes once you know the routing path.
Document your current cable routing with a photo before you disconnect anything. Phone cameras are good enough for this.
Seal Maintenance — the 5-Minute Fix
Every dropper post has a dust seal at the top of the stanchion. This seal keeps dirt out and air in. When it’s dirty or contaminated with sand, the post loses pressure or moves sluggishly. When it’s clean, everything works.
Weekly Cleaning Routine
After a muddy or sandy ride, take two minutes:
- Lower the post fully.
- Wipe the exposed stanchion clean with a dry cloth. Get all the grit off.
- Apply a thin layer of silicone-based lubricant (Slickoleum, SRAM Butter, or similar) to the dust seal area.
- Retract and extend the post five times to work the lubricant in.
This prevents seal degradation and keeps the post responsive. Do this monthly even if you’re not riding in mud.
Seal Failure vs. Dirt Buildup
A dirty seal feels slow. A failed seal feels leaky. If you notice air hissing from the dust seal when you press the lever, the seal is gone. If the post descends on its own when parked, the seal is also likely failed.
A seal that’s simply dirty will respond to cleaning and lubrication. You’ll notice immediate improvement. A truly failed seal won’t improve, and you’ll need a service kit or full post replacement.
When You Need a Full Service
Some failures go beyond a home fix. If you’re experiencing any of these, a full service is needed:
- Post has play or wobble in the seat tube even with the clamp bolt fully tightened.
- Air cartridge won’t hold pressure overnight—it drops 20+ PSI while parked.
- Visible hydraulic fluid or oil leaking from the post body.
- Post extends but won’t retract fully, or retracts but won’t extend fully, even after air pressure adjustment and cable tension checks.
A full service from a shop typically costs $60–$120 depending on the model and what needs replacement. This usually


Stay in the loop
Get the latest trail rise updates delivered to your inbox.