How to Tell Your Brake Pads Need Replacing
Mountain bike brake maintenance has gotten complicated with all the conflicting advice flying around. But here’s the thing — most of it comes down to one basic skill: knowing when your pads are done before your bike makes the decision for you. I learned this the hard way. Rode my pads completely into the backing plate on a dusty stretch outside Crested Butte, Colorado, then had to explain to a mechanic at a shop on Elk Avenue why I’d ignored metal-on-metal grinding for roughly three miles. He was not impressed.
This article includes affiliate links. We may earn a commission at no extra cost to you.
Today, I will share it all with you. Four signs your pads are finished. Learn them now.
Squealing or High-Pitched Noise
This one shows up first. Your brakes sound like a furious bird every time you pull the lever — that sharp, high-pitched shriek that makes other riders turn around and stare. It happens for a few different reasons: the backing plate vibrating, glazed pads from overheating, or contamination sitting on the rotor surface. Sometimes brand-new pads squeal during bedding in, which we’ll cover later. But if you’re still hearing it after 50 miles? Something is wrong.
I’m apparently more sensitive to brake noise than most of my riding buddies, and Shimano pads have always been louder for me while SRAM setups never bothered me much. That’s just how the material compounds behave — not a defect. If silence matters to you, factor that in before you buy.
Reduced Stopping Power
The lever still pulls. The brakes still engage. But you’re not stopping the way you used to — especially once things get wet. You’re hauling harder on the lever just to hit the same deceleration you’d get before without thinking about it. This is friction material worn below roughly 1.5 mm. Some pads have wear indicators built in — small metal nubs or shallow grooves sitting proud of the pad surface. Once the material drops down to those indicators, stopping power falls off noticeably. You’ll feel it before you see it.
Lever Pulling All the Way to the Handlebar
Probably should have opened with this section, honestly. This is the emergency signal. You squeeze the lever and it travels almost to the bar — a quarter-inch of throw left, maybe less. The brake technically functions, but you’re riding on fumes. Most hydraulic disc systems give you 2 to 3 inches of lever travel before contact. Lose most of that, and your pistons are extended too far out. Pads are nearly gone.
If your lever is touching the bar, stop riding. Replace the pads today. Not after the weekend. Not after one more lap. Don’t make my mistake.
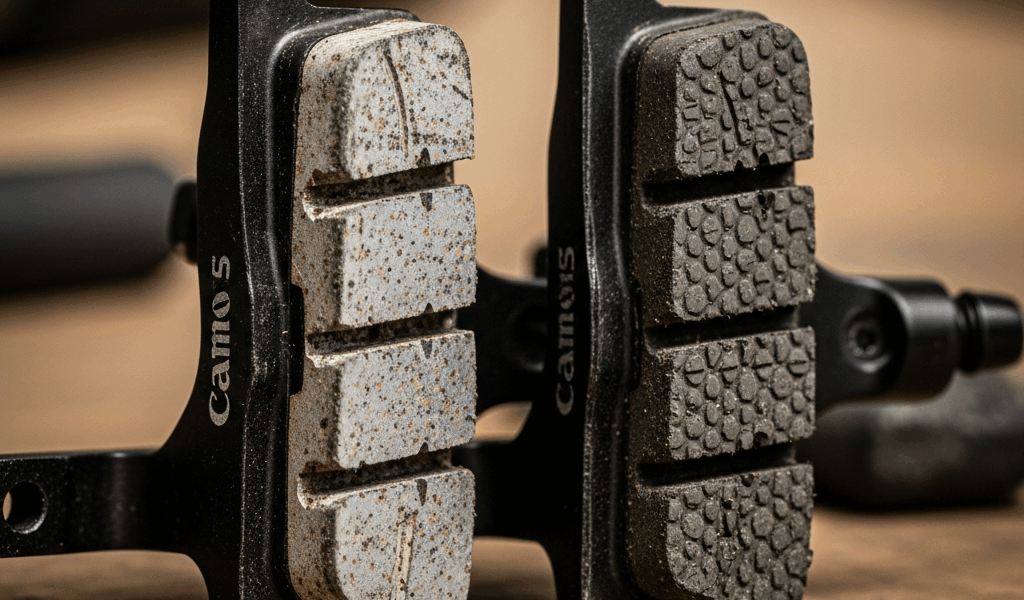
Visible Pad Wear
The simplest check requires zero tools. Just look at the pads. New pads come with 4 to 5 mm of friction material. You can eyeball them through the frame without removing anything — spin the wheel, peer into the caliper, and compare what you see to a credit card. If the pad material looks thinner than that card, or if you can spot the shiny metal backing plate underneath, you’re already overdue.
Shimano pads — used on XT, SLX, and Deore brakes — have small milled grooves as wear indicators. When those grooves vanish, roughly 1 mm of material is left. SRAM pads often skip the visual markers entirely, so you’re eyeballing thickness and looking for that exposed backing plate. Visible metal means the pads are done.
Organic vs Sintered — Which Compound for Your Riding
But what is brake pad compound, really? In essence, it’s the friction material bonded to the metal backing plate that actually stops your wheel. But it’s much more than that — it determines how your bike feels on every descent, how long your pads last, and how your brakes behave when the trail turns wet and technical.
Every pad you’ll buy is one of two types. That’s it. So, without further ado, let’s dive in.
Organic Pads
Organic compound feels softer, bites immediately, and gives you excellent modulation — small lever movements create proportional braking force rather than an all-or-nothing response. They’re also quieter. Way quieter. If you’re tired of your brakes announcing your arrival, organic is the move.
The tradeoff is wear rate. I typically pull around 1,000 to 1,500 miles from organic pads on my Trail 429 before they’re ready to swap. In persistent wet conditions, they lose grip compared to sintered material. They also fade under sustained heavy braking — the kind you generate bombing a long alpine descent for ten or fifteen straight minutes.
Organic works best on moderate terrain with frequent, light-to-medium braking. XC riding. Rolling trail systems. Anywhere you’re managing speed through varied terrain rather than running 40 mph descents.
Sintered Pads
Sintered pads are denser, harder, and built differently — compressed metal particles fused under heat and pressure. They handle more abuse. I get 2,000 to 3,000 miles from sintered pads depending on conditions, sometimes more. They’re louder. Noticeably louder. Some riders actually love that feedback; others find it maddening after hour three.
Where sintered earns its reputation: sustained heavy braking and wet conditions. The material stays consistent even when you’re dragging brakes down a 2,000-foot descent for twenty minutes. Initial bite isn’t as immediate as organic, but once you adjust to the feel, modulation is solid.
That’s what makes sintered pads endearing to us enduro and downhill riders. Repeated shuttle laps. Long mountain passes. Terrain that would chew through organic compounds in a single day.
How to Choose
Ask yourself two questions: How far do you ride in a typical month? What does your terrain actually look like?
Moderate trail riding in temperate conditions — pick organic. You’ll swap pads more often, but the feel is better and per-ride cost is lower. Serious wet-weather riding or downhill-heavy schedules — go sintered. Longer lifespan saves money over time even though individual pads run a few dollars more per set.
I run organic pads on my XC bike and sintered on my long-travel 29er. The XC bike sees rolling trail and technical rocky sections. The 29er gets punished on rocky descents. Different tools. Different needs.
How to Replace Brake Pads — Step by Step
Once you’ve committed to replacing the pads, the actual swap runs about fifteen minutes per wheel. While you won’t need a full workshop setup, you will need a handful of basic items — most of which are probably already in a kitchen drawer.
What You’ll Need
- New brake pads (correct size and compound for your specific brake model)
- A 2 mm or 2.5 mm Allen key (specific to your pad retaining pin)
- Degreaser or mineral spirits
- A clean rag
- Brake pad spacer — usually included with new pads — or an old credit card
Removing the Old Pads
Pull the wheel. This opens up full access to the caliper from both sides. Find the retaining pin on the back of the caliper — it’s the bolt holding the pad assembly together. Most Shimano pads use a 2 mm pin. SRAM uses 2.5 mm. Check your brake manual if you’re not sure which you have.
Unscrew the retaining pin completely. The pad assembly should slide out without much resistance. If it doesn’t budge, dried mineral oil or contamination is probably holding it. A light tap with a rubber mallet — nothing aggressive — usually frees it up.
Once the old pads are out, look at the rotor and the inside of the caliper. Any visible debris? Surface rust? A dry rag wipe handles dust and light oxidation.
Prepping the Caliper
Here’s where most people make mistakes. Do not spray disc brake cleaner directly onto new pads or into the caliper interior. I did this once on a set of Shimano XT pads and spent a solid hour troubleshooting why my new pads felt greasy and wouldn’t engage cleanly. Brake cleaner dissolves the pad binder and leaves an oily residue — exactly what you’re trying to avoid.
Use mineral spirits or a light degreaser instead. Apply it to the rag, not directly into the caliper. Wipe the interior surfaces where the pads will contact. You’re removing old pad dust and dried mineral oil, not stripping the caliper down to bare metal.
Installing New Pads
Look at your new pad set before installing anything. Two pads — sometimes one is marked with a small indicator or a different backing plate color. That usually indicates which side faces the rotor’s friction surface. Check the installation diagram that came in the box. It takes thirty seconds and saves significant frustration.
Slide the first pad into the caliper. Snug fit, no forcing. If you’re pushing hard, something’s misaligned — either the retaining pin hole is off or the pad itself is slightly warped.
Slide the second pad in on the opposite side. Gentle pressure. Both pads should sit flush against their respective pistons.
Resetting the Pistons
First, you should do this step fully — at least if you want your brakes to engage evenly. After inserting new pads, the caliper pistons may be sitting slightly extended. They need to return to their home position before you reassemble.
Press the pad assembly in gently. You’ll feel light resistance as the pistons push back. Hold a few seconds, release. Do this three or four times. This ensures the pistons are evenly seated and ready to engage when you hit the brakes.
Skip this step and your first hard brake application might push the pistons back unevenly — one pad engaging before the other. You’ll feel a pulling sensation, possibly hear rubbing. Neither is what you want on a descent.
Reinstalling the Retaining Pin
Insert the spacer — or that old credit card — between the pads where they’d normally sit around the rotor. This prevents them from closing while the wheel is off. Align the retaining pin hole, screw it in finger-tight, then snug it down with your Allen key. You’re not torquing it aggressively. Just enough to keep everything in place.
Reinstall the wheel. Spin it. Pads should not rub on the rotor.
The First Test
Before touching any trail, do three or four slow stops in a flat parking lot. The pads should feel responsive — no grinding, no unusual sponginess. Some squealing on the first stop is completely normal. Grinding or a mushy lever feel means something went wrong during installation — likely contamination or a piston alignment issue. Go back and repeat the resetting step.
Best Brake Pads by Brand
You’ve got options. Shimano and SRAM dominate simply because they’re the primary brake manufacturers, but aftermarket alternatives exist and are worth serious consideration depending on what you’re trying to fix.
Shimano Brake Pads
Shimano makes pads specifically for XT, SLX, Deore, and Saint brake models. OEM pads run $25 to $45 per set depending on the model — XT pads land around $35 to $40. Not flashy. Reliably functional.
Shimano’s organic compound might be the best option for quiet riding, as the softer material requires minimal rotor transfer to run quietly. That is because the compound is formulated specifically to reduce resonance in Shimano’s aluminum caliper bodies. If silence is the priority, their organic line is hard to beat.
SRAM Brake Pads
SRAM pads cover Code, Guide, and Level brake families. OEM sets run $30 to $50. Their sintered pads have a strong reputation for wet-weather performance — mist, mud, repeated soakings. Worth trying if rain is a regular part of your riding season.
One note: SRAM updated their pad designs recently. Older pads don’t fit newer calipers and vice versa. Check your brake’s model year before ordering. That detail trips people up constantly.
SwissStop Brake Pads
SwissStop is a Swiss aftermarket manufacturer — their BXP, BXM, and DR lines cover both Shimano and SRAM compatibility. Sets run $35 to $55, a slight premium over OEM. The advantage is performance tuning. Their organic pads are notably quiet and modulate beautifully. Sintered pads are durable without being punishingly loud. I’m apparently wired to notice brake noise more than most riders, and SwissStop organic works for me while standard Shimano sintered never feels quite right. If you want something between Shimano’s quietness and SRAM’s raw power, SwissStop deserves a serious look.
Galfer Brake Pads
Galfer is a Spanish manufacturer making aftermarket pads for most MTB brake platforms. Prices run $30 to $45. Their organic compound feels very similar to Shimano’s in noise profile and initial bite. Their sintered pads lean aggressive — maximum stopping power, louder than either SRAM or SwissStop. Popular with enduro and downhill riders who want power and don’t particularly care about the accompanying soundtrack.
Price Comparison
OEM pads from Shimano and SRAM average $30 to $40 per set. Aftermarket options stretch from $30 to $55. For most riders, the performance gap between OEM and aftermarket is subtle at best. Spend the extra money only if you have a specific complaint about your current pads — too loud, fading in wet conditions, wearing too fast. Otherwise, OEM pads are the sensible default. No shame in that.
Bedding In New Pads — The Step Everyone Skips
New pads won’t perform at full capacity until you bed them in. Ten to twenty moderate-speed stops. That’s the whole process. It builds a thin, even layer of friction material on your rotor surface and dramatically improves braking consistency — usually eliminating the noise that drives people crazy after installation.
What Bedding Actually Does
But what is bedding, exactly? In essence, it’s controlled material transfer from pad to rotor. But it’s much more than that — it’s matching two surfaces to each other. New pads come from the factory smooth. Your rotor has microscopic peaks and valleys from normal use. First contact between them is uneven. Bedding transfers a small amount of pad material onto those valleys, creating a compatible friction surface. Both surfaces become matched.
Without it, your first hard brake feels different from your tenth. Squealing. Inconsistent stopping. Mushy lever feel. All of it traces back to skipping this step.
The Bedding Protocol
Find a gradual descent. Nothing steep — you’re not testing limits here. Accelerate to 15 or 20 mph and brake firmly until you’re down to about 5 mph. Not panic-hard. Just firm, intentional pressure. Coast five seconds. Repeat ten to twenty times.
Squealing during this process is expected. Ignore it. Some slight burning smell is also normal — you’re generating heat and moving material. That’s the point.
After one ride of normal trail braking, your pads will feel noticeably better than they did straight out of the box. That comparison is always a little satisfying.
What Happens If You Skip It
Your brakes will work. They just won’t perform optimally. Squealing persists. Stopping power feels inconsistent for the first week. By week two or three, your normal trail riding will have accidentally bedded them in anyway — you’re just choosing to do it intentionally in a controlled environment rather than on a technical descent where inconsistent braking is genuinely dangerous.
I’ve skipped bedding out of laziness more than once. Don’t make my mistake. It always comes back around — usually on a rocky descent where I’m pulling harder on the lever than I should have to and wondering what went wrong. Spend twenty minutes. Do it right.
Bedding and Brake Temperature
Keep temperatures moderate during bedding. Long continuous braking generates heat that can damage new pad material before it’s fully seated. Hard stops followed by coasting — five to ten seconds between each — cycles temperature up and down gradually rather than pushing pads toward their thermal limits right out of the gate.
The goal is an even friction layer. Not maximum heat. Moderate, repeated stops achieve this far better than a single brutal application ever will.


Stay in the loop
Get the latest trail rise updates delivered to your inbox.