Why Tubeless Setups Fail to Seal
MTB tubeless has gotten complicated with all the conflicting advice flying around. You did everything right — bought the Stan’s tape, grabbed the valves, picked up a bottle of sealant. And yet here you are, staring at a flat tire twenty minutes after you pumped it up. I’ve been there more times than I’d like to admit. After rebuilding probably a dozen tubeless setups across four different bikes, I learned everything there is to know about why these things fail. Today, I will share it all with you.
Most people skip straight to “add more sealant.” That’s the wrong move — at least if the actual problem is your rim tape or a valve that never seated right. Those extra 60ml of Stan’s Tire Sealant won’t save you. What actually works is diagnosing these failures in the right order, the way a mechanically confident rider would approach it.
So, without further ado, let’s dive in.
Step 1 — Check and Redo the Rim Tape
Probably should have opened with this section, honestly. Rim tape is the entire foundation of a tubeless setup. One bubble, one spoke hole bleed-through, one sloppy overlap near the valve hole — any of those will bleed air constantly, no matter what else you do right.
Pull the tire off. Spin the wheel slowly under a bright light and look at the tape from the side. You’re hunting for bubbles, wrinkles, lifted edges. See any? The tape comes off completely. Don’t patch it — don’t even try.
Here’s what actually matters:
- Width — Measure your rim’s internal channel width before you buy anything. Most modern trail rims run 25mm internally, which means 28mm or 30mm tape. I’m apparently a 30mm person and Gorilla Tape works for me while narrow plastic tape never did. If the tape doesn’t cover the channel walls edge to edge, spoke holes will weep air and you’ll chase the problem forever.
- Material — Cloth-backed tape like Stan’s yellow stuff conforms to the rim. Plastic tape tears, lifts, and doesn’t want to stick to curved surfaces. I made the mistake of switching to a generic plastic tape from Amazon — $6 for a huge roll, seemed like a deal — and spent two and a half hours figuring out why air kept escaping near spoke hole seven. Go cloth. Every time.
- Application — Start at one spoke hole, stretch the tape gently as you go around the rim, and overlap your starting point by at least half an inch. Too much tension and it’ll bunch at the edges. Too little and it won’t stick.
- The valve hole — This is where most people fail. Cut a small X, peel the flaps back, and press the edges flat against the rim surface. Any bubbling here is a death sentence for your setup. If it’s not lying perfectly flat, pull the tape and start over. A fresh roll of Stan’s runs about $14 to $18. That’s cheaper than a wasted afternoon.
Step 2 — Reseat the Valve and Check for Leaks
But what is a valve leak, exactly? In essence, it’s air escaping past the rubber gasket or the core threads without any visible spray. But it’s much more than that — it’s the failure mode that tricks people into thinking their tire or tape is bad when the actual culprit is a $4 valve that isn’t sitting flush.
Check this before you blame anything else. Don’t make my mistake — I replaced a perfectly good tire once because I never thought to check the valve base.
Unscrew the locknut — the small plastic or aluminum collar at the rim — and look at the valve’s rubber base. It needs to sit completely flat against the tape. If it’s rocking even slightly, the seal isn’t making contact. Reseat it, then hand-tighten the locknut the way you’d close a jar lid. That’s it. Over-tightening actually lifts the gasket away from the tape surface. I know that sounds backwards. It’s real.
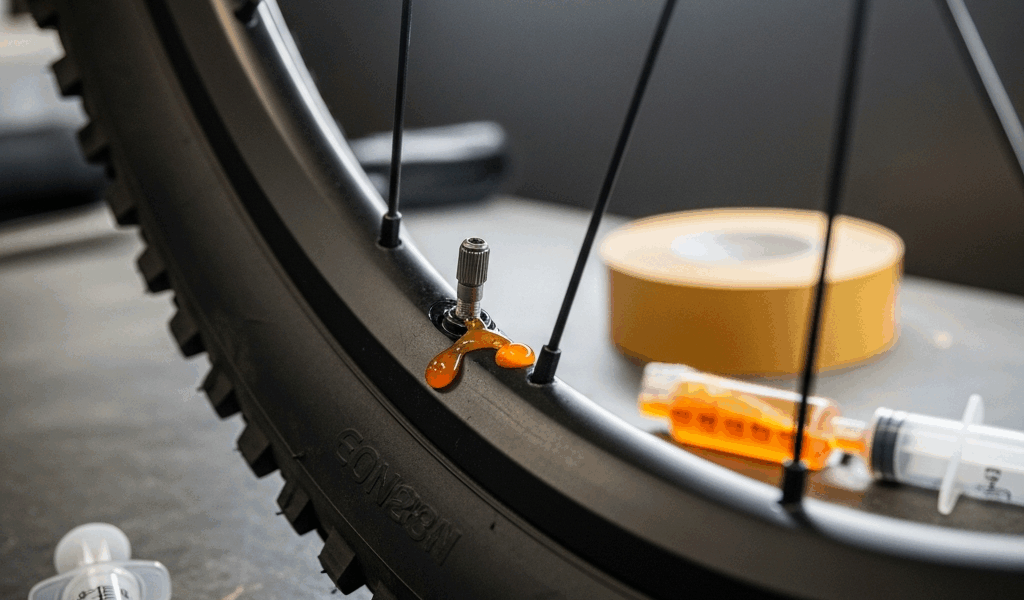
Next, mix dish soap with water in a spray bottle — I keep an old 8oz Windex bottle for exactly this — and spray the valve base, the core threads, and the full stem length. Watch for bubbles. Bubbles at the base mean the gasket isn’t sealing. Remove the valve, inspect the rubber gasket for cracking or deformation. Aluminum valves crack after a season or two of impacts. I had a Crankbrothers valve fail after about eighteen months. Replaced it for $9 and the problem vanished.
If the bubbles are at the core threads, the core might be cross-threaded. Unscrew it carefully with a valve core tool, check the threads, and reinstall hand-tight only. Valve issues account for roughly 20 percent of tubeless failures. That’s not nothing.
Step 3 — Reseat the Bead and Add Sealant Correctly
A bead that isn’t fully snapped into the rim shelf won’t seal. That’s what makes proper bead seating so endearing to us tubeless riders — get it right once and the whole system clicks into place. Get it wrong and no amount of sealant fixes it.
Seating the bead requires volume and speed. A standard floor pump won’t deliver either fast enough.
- Compressor — Fastest option by a wide margin. Most local bike shops will let you use their floor space for ten minutes if you ask nicely. One sharp burst and the bead snaps in with that satisfying pop.
- Portable pump with compressor mode — The Lezyne Pressure Drive or Topeak Joe Blow Booster both work well here. Slower than a shop compressor but still effective. Budget around $60 to $90 for a decent one.
- CO2 cartridges — Use the 25g size, not the 16g. Works in a pinch but burns through cartridges quickly. Treat this as backup.
Once the bead is seated, add sealant through the valve — remove the core first with your valve tool, pour it in, reinstall the core. Volume by tire size:
- 27.5 x 2.1 to 2.4: 60ml
- 27.5 x 2.5 to 2.8: 80ml
- 29 x 2.1 to 2.4: 70ml
- 29 x 2.5 to 2.8: 100ml
Spin the wheel in every direction for 30 to 45 seconds. Upside down, on its side, bouncing gently while rotating. You should hear the sealant sloshing around the bead. That sound means it’s coating the surfaces it needs to coat.
One more thing. Sealant sitting longer than four to six months starts to dry out and thicken. Old sealant won’t flow into small gaps the way fresh sealant does. I learned this the hard way after a bike sat through an entire Utah winter — poured in fresh Orange Seal and the problem I’d been chasing for two rides disappeared immediately. Replace old sealant. Don’t debate it.
When the Tire Still Won’t Hold Air
Frustrated by a setup that still leaks after you’ve done everything above? The problem has moved past technique. You’re looking at physical damage — and no amount of process fixes that.
Tire casing damage. Micro-cracks and pinhole punctures in the sidewall won’t seal with sealant alone. Pull the tire, hold it under a bright light, and flex the casing slowly. Thin spots catch light differently. Damage means the tire is done.
Rim damage at the bead shelf. Run your fingers around the bead shelf — the ledge where the tire locks in. It should feel completely smooth all the way around. A dented or rough bead shelf prevents sealing. Rare with modern rims, but it happens after rock strikes.
Incompatible tire and rim combination. Some tires have loose beads by design. Some rims are spec’d tight. Mix a loose-bead tire with a tight-bead rim — or the reverse — and seating becomes nearly impossible. Check your rim and tire specs before you spend another hour troubleshooting.
Small punctures respond well to a plug — the Dynaplug Micro Pro handles most trail damage cleanly. Structural sidewall damage? Accept it and move on. The tire is done. You’ve done the diagnosis correctly.
Start with the tape. Move to the valve. Then the sealant. This new diagnostic order took hold among experienced home mechanics several years ago and eventually evolved into the standard process tubeless riders know and trust today. If all three check out clean and air is still escaping, the answer is physical damage — and you’ve earned the right to say so.


Stay in the loop
Get the latest trail rise updates delivered to your inbox.