MTB Chain Skipping Under Load — Every Fix from Simple to Shop
Mountain biking has gotten complicated with all the drivetrain noise flying around. As someone who’s pushed through mid-climb skips, ghost shifts, and full mechanical meltdowns on the trail, I learned everything there is to know about what’s actually causing your chain to skip under load. Today, I will share it all with you.
Chain skipping lives on a spectrum. Five-minute fix on one end. Full shop visit on the other. This guide covers both — organized so you can actually diagnose the thing instead of guessing.
60-Second Trail-Side Check
Frustrated by a drivetrain that was skipping every third pedal stroke on a Saturday ride, I pulled over at a trailhead and spent two minutes with my multitool before finishing the whole loop clean. That was two barrel adjuster half-turns and nothing else. The problem was gone.
So, without further ado, let’s dive in.
The Barrel Adjuster Half-Turn
Start here. Every time.
Your derailleur has a barrel adjuster — a small cylindrical dial where the cable housing meets the derailleur body. Turn it counterclockwise exactly half a turn. That’s it. This adds slight cable tension, nudging the derailleur toward the larger cogs. Middle-cog skipping under load responds to this more often than riders expect.
Under load, the derailleur cage shifts slightly due to chain tension pulling against it. A half-turn compensates for that micro-movement. Do one half-turn. Shift through the whole cassette. Improved? Do another half-turn. Never do a full rotation without testing first — you’ll overshoot and create a whole new problem.
B-Tension Screw Check
Find the B-tension screw on your rear derailleur. It’s the adjustment screw sitting closest to the cassette, on the derailleur body itself. This screw controls the gap between the derailleur cage and your cassette teeth.
When you’re on the smallest cog, that gap should be roughly 1.5 millimeters. Too tight — screw turned in too far — and the cage physically binds. Too loose, and the chain struggles to shift cleanly onto small cogs when you’re actually pushing watts.
Noticing skipping on your smallest cog? Turn the B-tension screw counterclockwise a quarter turn. Test. Sometimes that’s the whole fix.
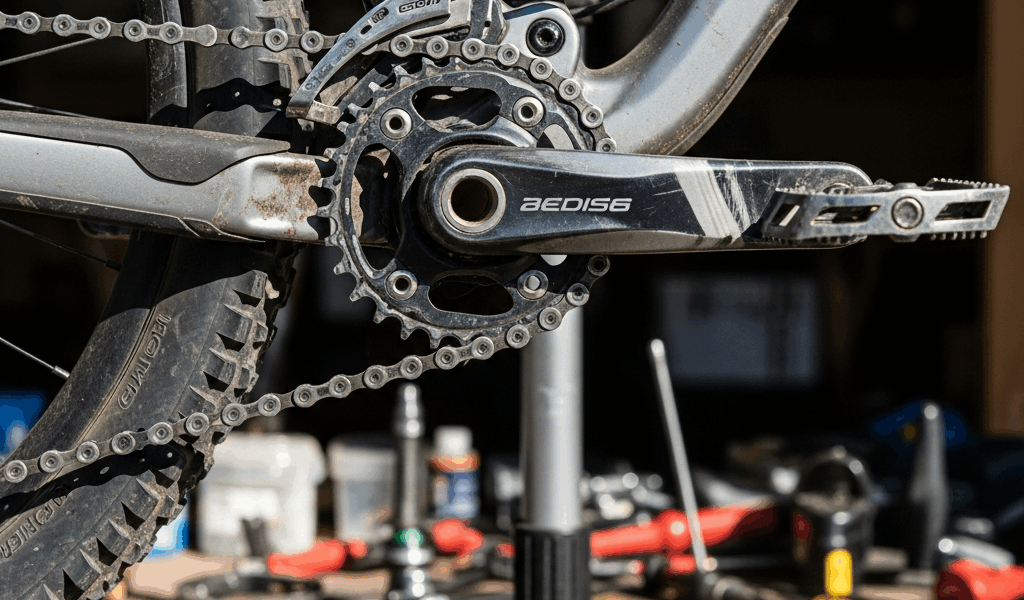
Stiff Chain Links
Probably should have opened with this section, honestly.
Run your finger backward along the chain while slowly spinning the cranks. You’re feeling for links that don’t articulate smoothly — sticky, resistant, slightly crunchy compared to the links around them. A seized link can’t wrap cleanly around cogs under load. It skips.
Fixable right now. Grab your multitool and find the chain breaker. You don’t need to remove the link — just insert the pin tool into the affected rivet and turn the handle slowly. Two or three turns usually frees it. Spin the chain again. Stiffness gone? You’re done. Still stiff? Remove that link entirely.
Don’t make my mistake — I spent twenty minutes staring at my cassette on a trail in Colorado before someone suggested I just feel the chain. Took thirty seconds after that.
Chain Wear — How to Check and When to Replace
A worn chain is probably the most common cause of skipping, and checking it requires exactly one tool: a chain wear checker. They run $12 to $20. Every serious mountain biker should have one rattling around in their gear drawer.
The Measurement Standard
But what is chain wear, exactly? In essence, it’s the gradual stretching of the chain’s pitch — the distance between each link — as metal wears against metal. But it’s much more than that. It’s also the thing quietly destroying your cassette while you ride, blissfully unaware.
Your checking standard depends on your drivetrain generation.
12-speed chains (Shimano 12-speed, SRAM 12-speed, most current-gen MTB setups): Replace at 0.5 percent wear. Your chain checker has a notch marked “0.5%.” If it drops in, the chain is done.
10-speed chains (older Shimano, SRAM X9, X7, mixed drivetrains): Replace at 0.75 percent wear.
Modern 12-speed chains have narrower links and tighter tolerances. They wear faster. Staying at 0.5 percent prevents the situation where you’re 200 miles into a chain’s life, feeling fine, and skipping suddenly appears. That’s a cassette-damage situation now, not just a chain situation.
Checking the Chain Properly
Place your chain checker on the chain while it’s on the bike, under no tension. Depress the tool slightly — don’t force it. Slides in easily at the 0.5 percent mark? Chain is worn out. Replace it before it chews through your cassette.
Many riders check their chain once a year. That’s not enough — at least if you’re riding rocky terrain or anywhere near sand. Check every 500 miles or every month during heavy season. I’m apparently obsessive about this and check mine before every ride if the previous week was rough. Probably overkill. But I haven’t replaced a cassette due to chain neglect in three years.
Shimano vs. SRAM Chain Life Differences
Shimano chains — the 12-speed CN-M6100 and 11-speed CN-HG901 specifically — typically hit 0.5 percent wear around 1,500 to 2,000 miles on rocky terrain. SRAM chains, like the 12-speed PC1230 and 11-speed PC1170, sometimes stretch slightly slower, often reaching 2,000 to 2,200 miles before replacement.
Neither brand is dramatically better. The variance comes down to terrain and how often you clean and lube. Dry, clean riding extends both. Sandy or wet riding destroys both equally fast.
A replacement 12-speed chain costs $35 to $55. Replace it early. You’ll save your cassette — which costs a lot more.
Cassette Wear — The Hidden Cause
Here’s a scenario that catches riders constantly. Your chain finally stretches past 0.5 percent. You order a new one, install it yourself, ride five miles — and the skipping is back. You just learned an expensive lesson about cassette wear. I learned it on a Tuesday night ride in 2021. New KMC chain, three days old, skipping constantly. The cassette teeth were done.
A worn cassette has one clear visual signature: shark fin teeth. The leading edge of each tooth sharpens to a point instead of staying rounded. Your new chain wraps around those pointed teeth and slips off the engagement point — the tooth geometry no longer matches the chain roller diameter.
How to Visually Inspect Your Cassette
Remove your rear wheel. Look at the cassette from the side — not from above. Sight along the length of the smallest cog. Healthy teeth are rounded and symmetrical. Worn teeth look sharpened or picked. The leading edge comes to a point. Trailing edge stays rounded. If you see that profile anywhere, replacement is necessary.
Climbing gears wear first. Check your 3rd, 4th, and 5th cogs from the largest before you bother with anything else. Most riders spend roughly 70 percent of their pedaling time in those middle gears — especially on climbs where the load is highest. A cassette can have significant wear on climbing cogs while the sprinting gears still look brand new.
Cost Reality — Cassette vs. Full Drivetrain
Cassette replacement runs $80 to $180 depending on the groupset. Full drivetrain replacement — cassette, chain, chainring — runs $250 to $500. If only your cassette shows shark fin wear and your chain is under 0.5 percent, replace the cassette only. Chain also over 0.5 percent? Replace both together. Always.
Never install a new chain on a severely worn cassette. Never install a new cassette on a chain that’s already sitting at 0.4 percent wear. Either pairing guarantees skipping within 100 miles. That’s what makes this the most frustrating part of drivetrain maintenance — the components are interdependent in ways that aren’t obvious until you’ve wasted money ignoring it.
What About the Chainring?
MTB chainrings wear far slower than cassettes. Load distributes almost equally across all the teeth, so wear is gradual. A chainring rarely needs replacement before the cassette — at least if you’re running standard terrain and not doing something aggressive with a single ring setup under constant heavy load.
Check it visually alongside the cassette. Don’t replace it unless you see severe wear — teeth that are visibly thinner than their neighbors, or leading edges that come to a sharp point.
Derailleur Alignment and Hanger Check
A bent derailleur hanger is invisible to most riders until it’s causing gear-specific skipping. The hanger is the small aluminum bracket that bolts to the rear dropout and holds the derailleur body. It’s intentionally designed as a sacrificial part — bends before your frame does. Every crash, every rock strike, every time someone leans your bike against a wall at the wrong angle can bend it slightly.
Testing for a Bent Hanger
Grab a straightedge — even a ruler or the spine of a hardback book works here. Position it against the derailleur cage from behind while the bike sits upright. The straightedge should sit flush against the outer plate of the cage. Gap on one side? Cage tilts visibly? Bent hanger.
Another test: shift to the largest cog. The derailleur cage should sit about 1.5 millimeters from the cassette. Now shift to the smallest cog. That gap should hold roughly constant. If it changes dramatically between shifts, or binds on certain cogs, a bent hanger is almost certainly the cause.
Why Bent Hangers Cause Gear-Specific Skipping
Here’s the diagnostic pattern worth memorizing. Skipping in climbing gears, but big gears feel fine — or the exact opposite. That selective skipping points toward a bent hanger. As the derailleur cage positions itself closer or farther from the cassette across different gears, a bent hanger exaggerates the misalignment in certain positions only.
A hanger bent 2 millimeters might be imperceptible when the cage sits far from the cassette in small cogs. Move that cage close to the cassette in large cogs — now you have a real problem. That’s what makes it tricky to diagnose without actually looking at the hanger directly.
Shop Tool vs. DIY Correction
A hanger alignment tool runs $40 to $80 and takes some practice to use safely — over-correcting can snap the hanger entirely. Most shops have the tool and charge $20 to $40 for alignment. Worth every dollar if your hanger is bent.
Some riders carry spare hangers on longer trips. Compatibility varies by frame — you need the exact hanger for your specific dropout style. Check your bike’s manual or call the frame manufacturer before buying spares. They run $15 to $35 each, which is cheap insurance on a multi-day trip.
When Nothing Works — Clutch and Freehub Issues
You’ve done the barrel adjuster. Chain isn’t stiff. Cassette looks clean. Hanger is straight. Skipping persists. Now you’re in shop territory — the problem lives inside the derailleur or hub, and neither of those is something you want to guess at trail-side.
Rear Derailleur Clutch Wear
Modern MTB derailleurs have a clutch mechanism — a spring-loaded system that controls how much lateral movement the cage allows. It dampens chain slack and stops the chain from bouncing off the cassette on rough terrain. It also wears out eventually.
A worn clutch allows excessive cage play. You shift, the cage overshoots the target gear, and the chain skips. The skipping feels inconsistent — sometimes it happens, sometimes it doesn’t — depending on pedaling load and how the cage moves in that moment.
Diagnosing clutch wear requires removing the derailleur and inspecting the clutch mechanism internally. Clutch mechanisms aren’t field-serviceable on most modern derailleurs. Replacement means a new derailleur — expect $200 to $350 for a replacement Shimano or SRAM unit.
Freehub Body Engagement Problems
Your freehub is the ratcheting mechanism inside the rear hub that lets you coast. Worn engagement teeth mean the cassette sits slightly loose on the freehub body. Under heavy load, the cassette can shift microscopically relative to the chainrings — and the chain skips.
This is rare on modern hubs but real on older or heavily used ones. It shows up as skipping that happens randomly, across multiple gears, and doesn’t respond to any of the adjustments above. Hub service or replacement — that’s shop work, not trail-side work.
When to Stop and Book an Appointment
If you’ve worked through everything above and skipping persists, stop. You’re past the point where parts swaps or adjustments help. A shop can pressure-test the drivetrain, measure hanger alignment with precision tools, and inspect internal derailleur and hub components.
This is wisdom I arrived at slowly — after several hours of troubleshooting a skip that turned out to be a worn freehub body on a 2019 wheelset I’d pushed way past its service interval. I checked everything else twice before finally dragging it in. Don’t make my mistake. Just book the appointment.


Stay in the loop
Get the latest trail rise updates delivered to your inbox.